Taking Control of Your Passwords with Bitwarden

We deal with several dozens of passwords everyday, from emails, to banking, to online shopping. While most of us are well aware of the risks of using the same password, we tend to reuse passwords. The reason for this bad habit is quite simple: it is humanly impossible to keep track of fifty-odd passwords. But, software (more precisely password management software) have no problem doing that. This is exactly why most of us hit the Yes button when Chrome offers us to save passwords. We hit the Yes button almost unconsciously, without any regard to its consequences. Letting your browser save your “one size fits all” password is not going to solve your problem. In fact it is going to cause more trouble down the line. Knowing all these well, I myself have committed this crime for the longest time. I had a rude awakening some months ago when Chrome started to constantly nag me about compromised passwords. Not one or two but, some twenty-odd passwords. That is when I finally decided to use a password manager.
If you are in the market for a password manager, you got many choices: free and paid; offline and online; simple and fairly complicated. I needed a good quality free password manger with online access. It had to be simple enough because I wanted to get my wife to use it too. After doing some research, I have decided to go with the free version of Bitwarden.
Bitwarden
Bitwarden is an open source password management system. Bitwarden offers both free and paid versions: multiple paid plans are available for individuals, families and organizations. The free version of Bitwarden has enough features to satisfy most individual users. In 2021, U.S. News and World Report ranked Bitwarden as the “Best Password Manger” in its first-ever password-protection program comparison. The Bitwarden password management service offers desktop, mobile, browser based and command line client applications for wide variety of systems.
Foolish Assumptions
As a writer, I must make some assumptions about the readers of this blog post to provide the right amount of information. This blog post assumes that you,
- use Chrome or a similar web browser
- primarily deals with passwords while browsing
- are storing passwords in the browser’s built in password manager or have it enabled (even though you are not storing passwords)
Step 1: Disabling Browser’s Built in Password Manager
If you are planning to switchover to Bitwarden, it is a good idea to turn off Chrome’s built in password manager. The last thing you need is two password managers competing to store your passwords. You can disable Chrome’s built in password manager by following the steps below.
-
Click the three dots on the top right corner of the browser and select “Settings” from the dropdown menu.
-
Locate the “Autofill” box, click the arrow next to “Passwords” and turn off “Offer to save passwords”. Important: If you don’t have a record of your existing passwords, check under “Saved passwords” in Chrome’s password manager. Please make sure to have a backup of your existing passwords before you disable Chrome’s built in password manager.
-
Repeat this process for the other two “Autofill” options: “Payment methods” and “Addresses and more”

Instructions for other browsers may be obtained from an online search query such as “how to disable password manager in [your browser’s name]”.
Step 2: Registering for a Free Personal Plan on Bitwarden
In order to register for an account on Bitwarden, you need a master password. Master password is the password that you use to access your Bitwarden account. Without this you have no access to passwords stored in the Bitwarden vault. It is extremely important to pick a long, complex and unique password as your master password. For any reason, do not use a password that you have used for any other purpose. This password has to be unique and there should not be a second instance of this password. One popular method is to use a sentence that make no sense as your master password. You can also store a password hint at the registration. Follow this link to register for a free personal plan.
Step 3: Installing the Browser Extension
Visit Bitwarden downloads page and click on the relevant web browser link to get the browser extension. Follow the instructions to install the browser extension.
Step 4: Basic Usage
I will explain the basic usage of Bitwarden using their browser extension for Chrome. The same principles should apply to other browser extensions and desktop clients although the look and feel of different clients may vary.
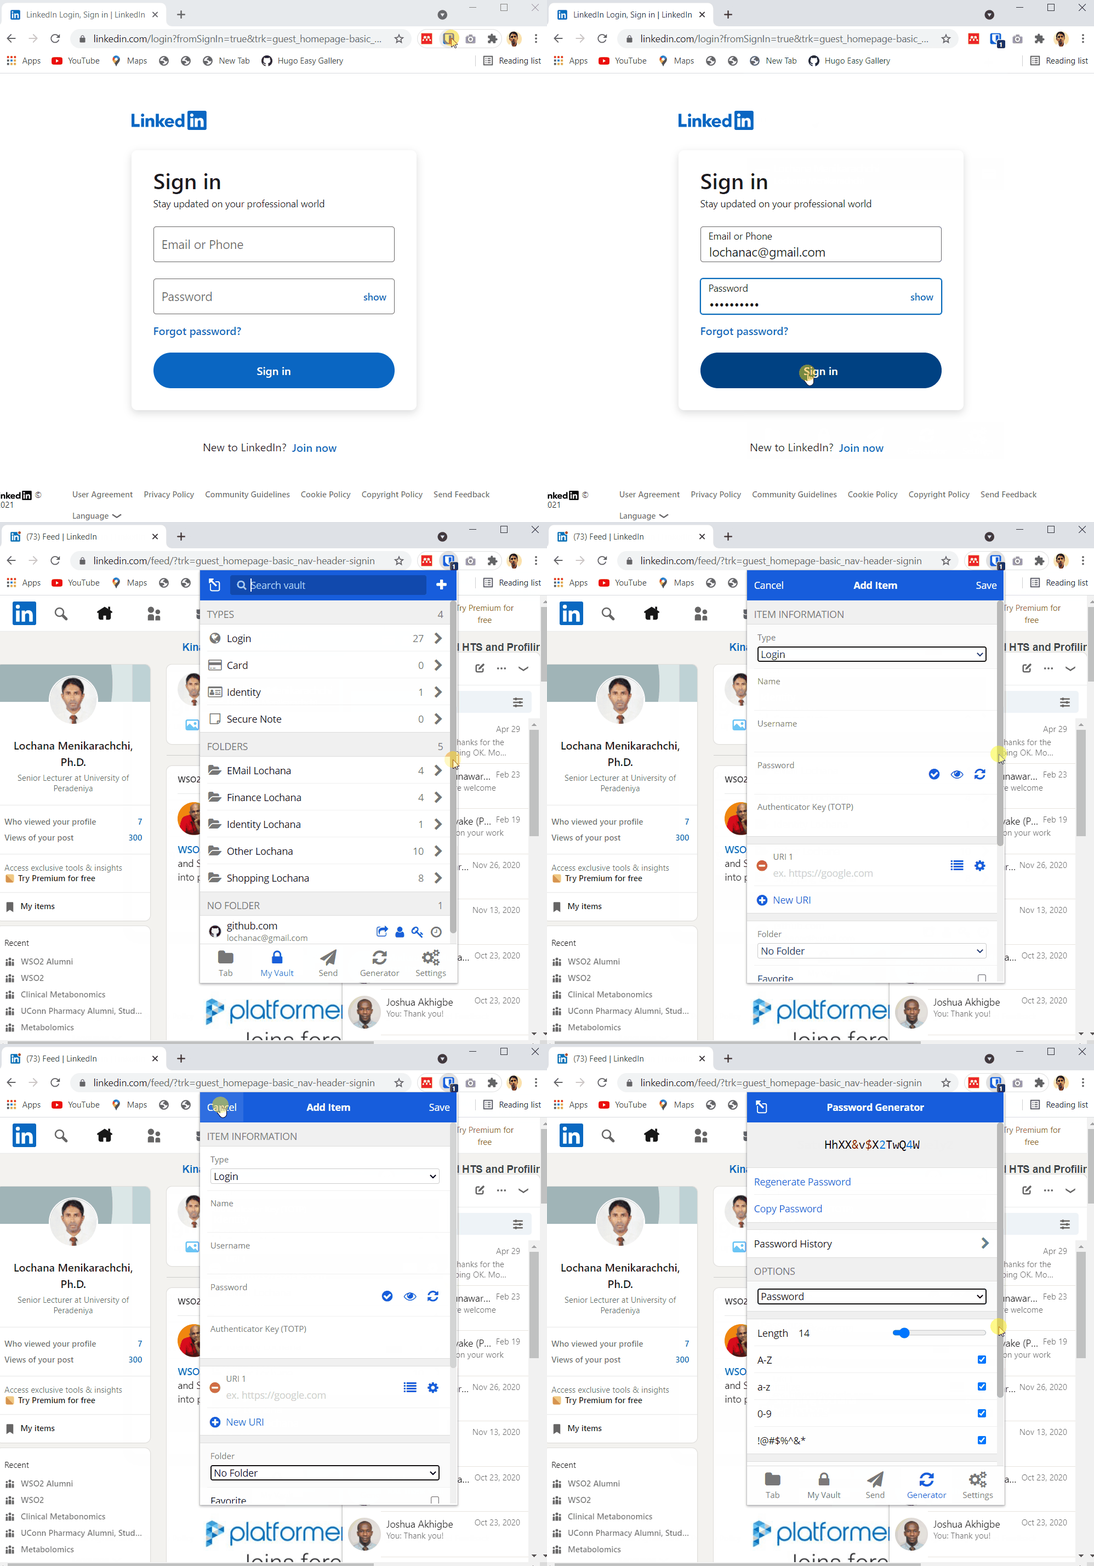
You can log in to Bitwarden by clicking the browser extension icon. In Chrome, this is usually located next to the address bar. Type in your master password and log in to Bitwarden. By default, your login expires when you close the browser. As shown below, the browser extension has 5 tabs.
- Tab
- My Vault
- Send
- Generator
- Settings

1. Tab
Once you log in, you are in “Tab”. Tab shows logins for currently selected web page. In my animated example, I have Linkedin login page opened and “Tab” shows Linkedin. If I click on that link it will automatically fill in the login credentials.
2. My Vault
Bitwarden allows you to store 4 types of items in the vault; Logins, Cards, Identities, and Secure Notes. Logins are used for storing username/password combinations. Cards can be used for storing credit and debit card information. Identities are used for storing various personal information that can be used in the filling of online forms such as shipping information or billing information. Secure Notes can be used for storing encrypted textual information. All four types of items can be organized into folders. Click on the + button on the top right corner to create a new item. Select the type and fill out the information to create a new item. You can use Bitwarden’s built in password generator (button with two arrows) to generate a password or passphrase.
3. Send
Send is a mechanism to share encrypted sensitive information with just anyone. You can send any textual information or file attachments up to 500 MB via sends. The link can be texted or e-mailed to anyone. The recipient doesn’t need to have Bitwarden installed.
4. Generator
Generator is Bitwarden’s password/passphrase generator. You can customize your passwords/passphrases to specified lengths including capitalizations, numbers and other special characters.
5. Settings
Settings tab allows you to manage your folders, sync your data and change account related settings.
I think that’s enough information to get you started. For more information please visit Bitwarden help pages.

